
Taking a screenshot is one of the most useful features on any computer. Whether you’re saving a receipt, capturing an error message, or sharing something interesting on your screen, knowing how to screenshot on Mac can save you time and effort.
The good news? Apple makes screenshots incredibly easy. With just a few keyboard shortcuts or built-in tools, you can capture your entire screen, a specific window, or even crop part of the screen instantly.
In this guide, you’ll learn how to screenshot on MacBook, Mac Air, Mac Mini, Mac Pro, and Mac desktop computers, along with tips for cropping screenshots, pasting them, and taking screenshots even without a keyboard.
How to Screenshot on Mac Using Keyboard Shortcuts
The fastest way to take screenshots on a Mac computer is by using keyboard shortcuts. These built-in commands work on MacBook, MacBook Air, MacBook Pro, iMac, and Mac Mini.
1. Screenshot the Entire Screen
If you want to capture everything displayed on your screen:
Press:Command (⌘) + Shift + 3
Your Mac will instantly take a screenshot and save it to the desktop.
This method works on:
-
MacBook laptops
-
Mac desktop computers
-
Mac Mini
-
Mac Pro
-
iMac
If you’re wondering how to screenshot on Mac desktop or Mac computer, this is the simplest method.
2. Screenshot a Selected Area
Sometimes you only want a specific portion of the screen.
Press:Command (⌘) + Shift + 4
Your cursor will turn into a crosshair. Then:
-
Click and drag over the area you want to capture.
-
Release the mouse to take the screenshot.
This is the easiest method for how to screenshot on Mac and crop, since you can select exactly what you want.
3. Screenshot a Specific Window
Want to capture only one application window?
Press:Command (⌘) + Shift + 4, then press Spacebar
Then:
-
Hover over the window you want
-
Click it
The window will be captured automatically.
How to Screenshot on Mac and Paste
Sometimes you don’t want to save the screenshot as a file. Instead, you may want to paste it into an email, document, or chat.
To screenshot on Mac and paste directly:
Press:
Command (⌘) + Control + Shift + 3
or
Command (⌘) + Control + Shift + 4
This copies the screenshot to the clipboard so you can paste it using:
Command (⌘) + V
This is especially useful when sharing screenshots quickly.
How to Screenshot on Mac and Crop
There are two main ways to crop screenshots on a Mac.
Method 1: Select the Area Before Taking the Screenshot
Use:
Command + Shift + 4
Then drag to capture only the desired area.
This is the easiest way to screenshot on Mac with crop.
Method 2: Crop After Taking the Screenshot
-
Open the screenshot in Preview
-
Click Markup
-
Select the part you want
-
Click Crop
This method gives more control for editing images.
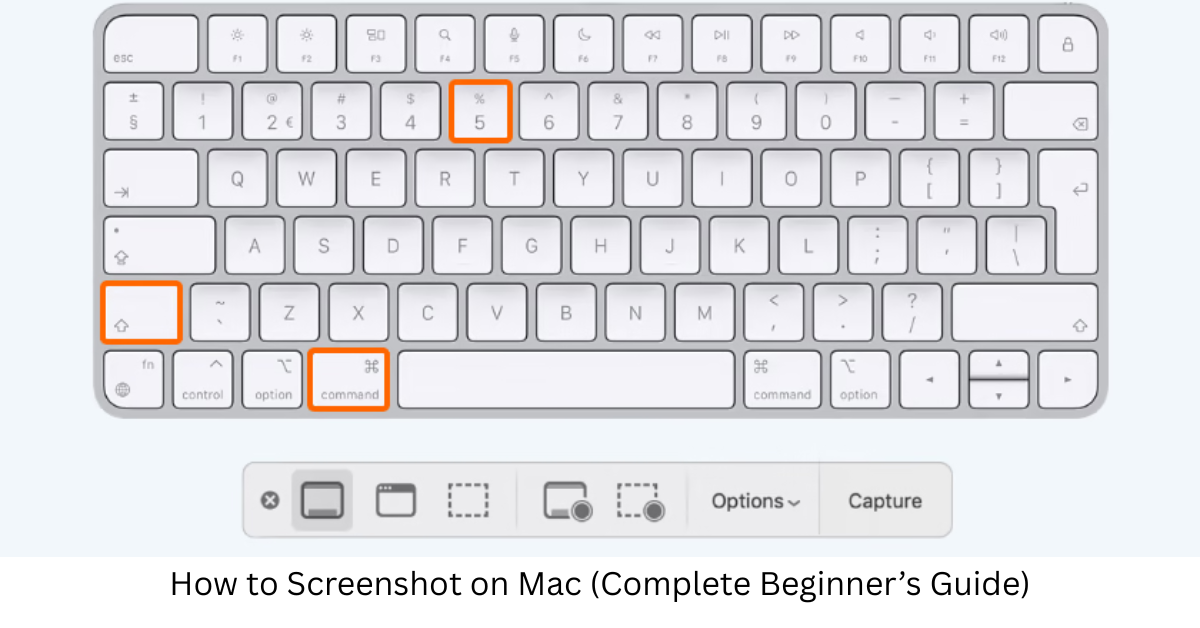
Using the Mac Screenshot Toolbar
Apple introduced a built-in screenshot tool in macOS Mojave and later.
Open it by pressing:
Command (⌘) + Shift + 5
This opens the screenshot toolbar, which lets you:
-
Capture the entire screen
-
Capture a selected window
-
Capture a portion of the screen
-
Record your screen
-
Choose where screenshots are saved
It’s the best solution for users learning how to screenshot on Mac laptop or desktop with advanced options.
How to Screenshot on Mac Without Keyboard
If your keyboard isn’t working or you prefer using the mouse:
Method: Use the Screenshot App
-
Open Launchpad
-
Go to Other
-
Click Screenshot
This tool allows you to take screenshots without using keyboard shortcuts.
How to Screenshot on Mac With a Windows Keyboard
Some users connect a Windows keyboard to their Mac.
Here’s the key mapping:
| Mac Key | Windows Keyboard Equivalent |
|---|---|
| Command | Windows Key |
| Option | Alt |
| Control | Ctrl |
Example:
Windows Key + Shift + 3
= Screenshot entire screen.
This is useful for people searching how to screenshot on Mac with Windows keyboard.
How to Screenshot on Mac Mini or Mac Pro
The process is exactly the same as other Mac devices.
Common shortcuts:
-
Command + Shift + 3→ Full screen -
Command + Shift + 4→ Selected area -
Command + Shift + 5→ Screenshot toolbar
These work on:
-
Mac Mini
-
Mac Pro
-
iMac
-
Mac Studio
So if you’re wondering how to screenshot on Mac Mini or Mac Pro, the shortcuts remain identical.
How to Record Screen with Audio on Mac
While screenshots don’t capture audio, screen recordings can.
Use:
Command + Shift + 5
Then select Record Screen and choose your microphone.
This helps if you want to show tutorials or demonstrations.
Where Mac Screenshots Are Saved
By default, screenshots are saved to:
Desktop
File name example:
screenshot 2026-03-06 at 10.15.24.png
You can change the save location using the screenshot toolbar settings.
Tips for Better Mac Screenshots
Here are a few helpful tricks many Mac users don’t know:
-
Hold Spacebar while selecting area to move the capture region
-
Hold Shift to lock resizing direction
-
Press Escape to cancel a screenshot
-
Use Preview for quick edits and annotations
These small tips can significantly improve your workflow.
Frequently Asked Questions (FAQs)
How do I screenshot on a MacBook?
Press Command + Shift + 3 to capture the full screen or Command + Shift + 4 to capture a specific area.
How do you screenshot on Mac and paste it?
Press:
Command + Control + Shift + 3
Then paste it using Command + V.
How do I screenshot a selected area on Mac?
Press:
Command + Shift + 4
Then drag to select the part of the screen you want.
How do I screenshot on Mac without the Command key?
You can open the Screenshot app from Launchpad and capture screenshots using the interface instead of shortcuts.
Can Mac take scrolling screenshots?
macOS doesn’t support native scrolling screenshots. You’ll need third-party tools like:
-
CleanShot
-
Snagit
-
Shottr
Conclusion
Learning how to screenshot on Mac is a simple but powerful skill that can improve your productivity. With just a few keyboard shortcuts, you can capture your entire screen, select specific areas, or even record your screen.
Whether you’re using a MacBook Air, MacBook Pro, iMac, Mac Mini, or Mac Pro, the screenshot process remains the same across all devices.
Start with the basic shortcuts like Command + Shift + 3 or Command + Shift + 4, and once you get comfortable, explore the advanced screenshot toolbar for more control.
Also Read: Legal Guidance for Entrepreneurs
If you regularly work on your Mac, mastering screenshots will quickly become second nature.